Many bloggers use Google Friend Connect (GFC) for their Blogger.com blog to stay connected with the blog readers. When they migrate their blog from Blogger to self hosted WordPress, they loose their Google Friends in the migrated WordPress blog. This post will be helpful to get your Friends back onto the new WordPress blog.
Solution to get Google Friends Connect on your WordPress Blog
Select the profile that you are using for migrated blog and click on the Settings tab.
In the Settings tab click on the Advanced tab and scroll to find the Other Option field. Add the URL of your WordPress blog inside the Alternative Addresses box. Leave all the remaining URLs as they are.
Click on Save your Advanced Settings.
Now go back to the Overview tab on top left corner of the page and click on Add the members gadget box.
Configure your gadget settings as per your choice and click on Generate Code.
Copy and paste the generated code to your WordPress blog widget. For more info on how to use the WordPress blog Widget, read our User Guide on WordPress widgets.
Thus you can easily transfer your Google Friend Connect from your Blogger to WordPress blog.
The Goal: Your current blog at abc.blogspot.com is hosted on the Blogger platform but you now want to move this blog from Blogger to WordPress (self-hosted) with a personal domain name (say abc.com).
The Problem: WordPress.org provides an easy option to automatically import all your old blog posts and reader comments from Blogger into your new WordPress blog but there are still some bigger problems that are hard to ignore:
1. Some of your previous articles on the blogspot blog could be ranking very high in search engines for certain keywords but once you shift these articles to a new address, you might lose all that organic search traffic.
2. You cannot use a 301 redirect with Blogger to inform search engines that your site has permanently moved a new web address thus losing PageRank and other Google Juice.
3. Not just search bots, human beings who come to read your old articles via links from other sites won't know about the new location of those articles unless you manually insert the new links in each and every blogspot article (impossible for large blogs).
4. When you switch blogging platforms, existing blog readers who are subscribed to your Blogger RSS Feed may be lost forever if they don't manually update their RSS readers with your new WordPress feed address (and most won't).
5. When you lose RSS subscribers and search engines rankings, the pageviews will drop and that will seriously impact your AdSense revenue in case you are running Google ads.
The Solution: Now that you are aware of the various issues associated with moving sites from Blogger to WordPress, the very good news is that there exists a simple solution to deal with all these problems in one go.
You can quickly and safely migrate any blog from Blogger to WordPress without losing RSS Subscribers or human visitors and there's also a way to pass all that Google Juice from the old blogspot.com address to your new WordPress blog.
How to Move a Blog from Blogger to WordPress
Important: Before you implement anything, it may be a good idea to run through these steps on a dummy blog first. Also, backup your Blogger blog including the XML template, posts and comments just to be the safe side.
If something doesn't make sense, just watch the screencast video below (download).
Step 1: In case you haven't done this already - register a new web domain, buy server space from some web hosting company* that offers PHP / MySQL hosting and and install WordPress software on your new domain.
*This site is hosted on Dreamhost.com but there are other good hosting options like GoDaddy, Blue Host, Media Temple and Knowhost - most services offer one-click WordPress installation so you don't need the help of a geek.
Step 2: Go to your WordPress Admin Dashboard -> Tools -> Import and select the Blogger option. Authorize WordPress to access your Google Account and within minutes, all your old blog posts and comments will be available on the new WordPress site.
Step 3: Copy this file into your WordPress themes directory and then rename the file from blogger.php.txt to blogger.php. You may use either Putty with wget or Web FTP to access your WordPress themes directory located on the web server. For credentials and other details, check your cPanel.
Here are the contents of that file.
<?php
 /*
  Template Name: blogger
 */

 global $wpdb;
 $old_url = $_GET['q'];

 if ($old_url != "") {
   $permalink = explode("blogspot.com", $old_url);

   $q = "SELECT guid FROM $wpdb->posts LEFT JOIN $wpdb->postmeta ".
        "ON ($wpdb->posts.ID = $wpdb->postmeta.post_id) WHERE ".
        "$wpdb->postmeta.meta_key='blogger_permalink' AND ".
        "$wpdb->postmeta.meta_value='$permalink[1]'";

  $new_url = $wpdb->get_var($q)? $wpdb->get_var($q) : "/";

  header ("HTTP/1.1 301 Moved Permanently");
  header("Location: $new_url");
 }
?>
Step 4. Open your WordPress dashboard and go to Pages -> Add New Page. Keep the title and URL of that page as blogger and select "blogger" from the Template drop-down. Save. There's no need to add any content to this page.
Step 5. Open the template generator, type the full address of your new WordPress blog (including http:// and the trailing slash) and this tool will create a new classic template for your blogspot blog that will look something like this.
<!DOCTYPE html PUBLIC "-//W3C//DTD XHTML 1.0 Strict//EN" "http://www.w3.org/TR/xhtml1/DTD/xhtml1-strict.dtd">
<html xmlns="http://www.w3.org/1999/xhtml" xml:lang="en" lang="en" dir="<$BlogLanguageDirection$>">
<head>
<title><$BlogPageTitle$></title>
<script type="text/javascript">
 <MainOrArchivePage>window.location.href='http://labnol.org/'</MainOrArchivePage>
 <Blogger><ItemPage>
   window.location.href='http://labnol.org/blogger/?q=<$BlogItemPermalinkURL$>'
 </ItemPage></Blogger>
</script>

<MainPage><link rel="canonical" href="http://labnol.org/" /></MainPage>
<Blogger><ItemPage>
 <link rel="canonical" href="http://labnol.org/blogger/?q=<$BlogItemPermalinkURL$>" />
</ItemPage></Blogger>
</head><body>

<div style="border:#ccc 1px solid; background:#eee; padding:20px; margin:80px;">
<p>This page has moved to a new address.</p>

<h1>
<MainOrArchivePage><a href="http://labnol.org"><$BlogTitle$></a></MainOrArchivePage>
<Blogger><ItemPage>
 <a href="http://labnol.org/blogger/?q=<$BlogItemPermalinkURL$>"><$BlogItemTitle$></a>
</ItemPage></Blogger>
</h1>
</div>
</body></html>

<!-- replace labnol.org with your WordPress site URL --->
Step 6. Open your Blogger Dashboard -> Layout -> Edit HTML and choose "Revert to Classic Blog". Copy-paste the template generated in Step 5 in the "Edit Template" area and click "Save Template Changes".
Your are done. Open any page on your old Blogger blog and it should redirect you to the corresponding WordPress page. On the WordPress side, since we are using a permanent 301 redirect with the redirection URLs, all the Google Juice will probably pass to your new WordPress pages with time.
Update your RSS Feed: When you move from Blogger to WordPress, the address of your RSS feed will change as well. Go to Blogger -> Settings -> Site Feed, type the address of your new WordPress RSS feed here and Google Reader, Bloglines, etc. will automatically move to your new feed. Check this FeedBurner FAQ for some more ideas.
Video Tutorial - Move from Blogspot to WordPress
Now that your new WordPress site is up and running with all the old Blogger posts, here are a few important things you should do:
1. Add your new WordPress site to Google Webmaster, verify ownership and and submit a Sitemap listing the URLs on your new site.
2. When you migrate from Blogger to WordPress, all your pictures and screenshot images hosted on Blogger / Picasa Web Albums will not get imported into WordPress. Therefore never delete your old blogger blog as it will break images that are now embedded in your WordPress posts.
3. Once the search bots and human beings start flocking to your new site, you may update the homepage of your blogspot blog with links to some of your best posts.
4. To know how Googlebot will view your existing Blogspot blog, just turn off JavaScript in the browser and try visiting any of your old blog pages. It's a single link under H1 that points to your new address that internally does a 301 redirect.
Berikut adalah tutorial langkah demi langkah untuk menukar "template" atau tema blog anda. Below is the step by step tutorial to change your blog theme or template.
1. Log masuk ke http://www.blogspot.com/. Masukkan username dan password (email anda). Login to blogspot with your email.
Tukar blog template - klik untuk besarkan - click to enlarge
2. Selepas itu, klik bahagian "Design" dan seterusnya klik "Edit HTML". Then, click "design" and next "Edit HTML"
Tukar blog template - klik untuk besarkan - click to enlarge
3. Selepas itu skrin paparan berikut akan ditunjukkan. Next screen will be shown.
Tukar blog template - klik untuk besarkan - click to enlarge
4. Kita tinggalkan sekejap skrin tersebut. Sekarang kita cari template di google. Hasil dari carian di google, beberapa laman web yang menyediakan template untuk blog dipaparkan. We left our blog for a while and lets start finding the blog templates on Google.
google result - klik untuk besarkan - click to enlarge
5. Untuk contoh ini saya menggunakan laman web berikut untuk memuat turun template blog saya. http://btemplates.com/. For this sample I will download from http://btemplates.com/
Tukar blog template - klik untuk besarkan - click to enlarge
6. Saya menggunakan template Renown sebagai contoh. Klik download untuk memuat turun template tersebut. Selepas muat turun, double click file zip tersebut dan "drag" atau tarik masuk ke hard disk anda. I used Renown template as sample, and click download. Once downloaded, click the zip or rar file and drag the folder into your hard disk.
Tukar blog template - klik untuk besarkan - click to enlarge
7. Selepas itu, buka folder "Renown" tadi dan cari fail dengan sambungan xml. Then open the folder and search for the xml file.
Tukar blog template - klik untuk besarkan - click to enlarge
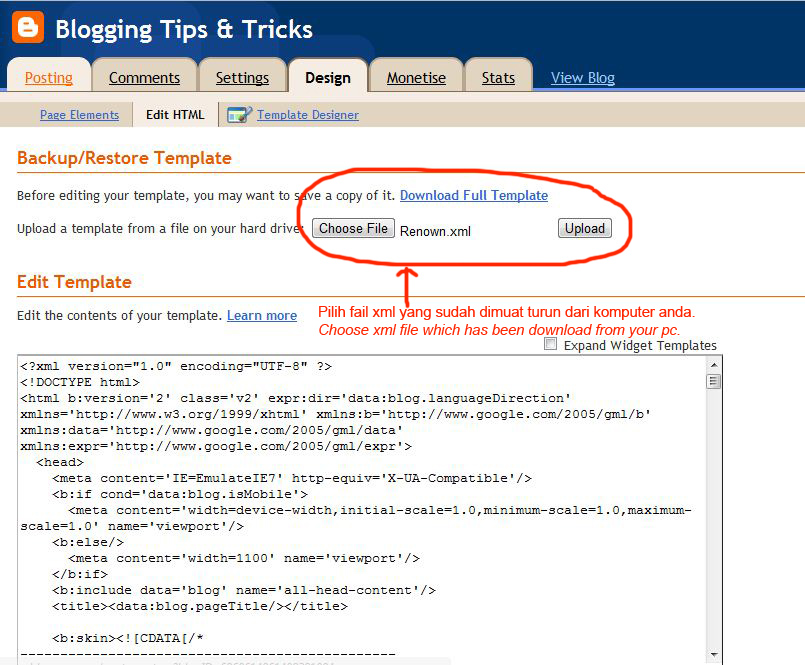
8. Sekarang kita kembali ke dashboard blog kita di laman "Edit Html" dan klik "Choose File". Now we go back to our blog dashboard at "Edit Html" then "Choose File"
Tukar blog template - klik untuk besarkan - click to enlarge
9. Setelah dipilih, fail tersebut akan dipaparkan. Pastikan anda memilih fail yang betul dan seterusnya klik "Upload". After chosen, the file will appeared in the dialog box. Make sure it is the correct file and click "Upload".
Tukar blog template - klik untuk besarkan - click to enlarge
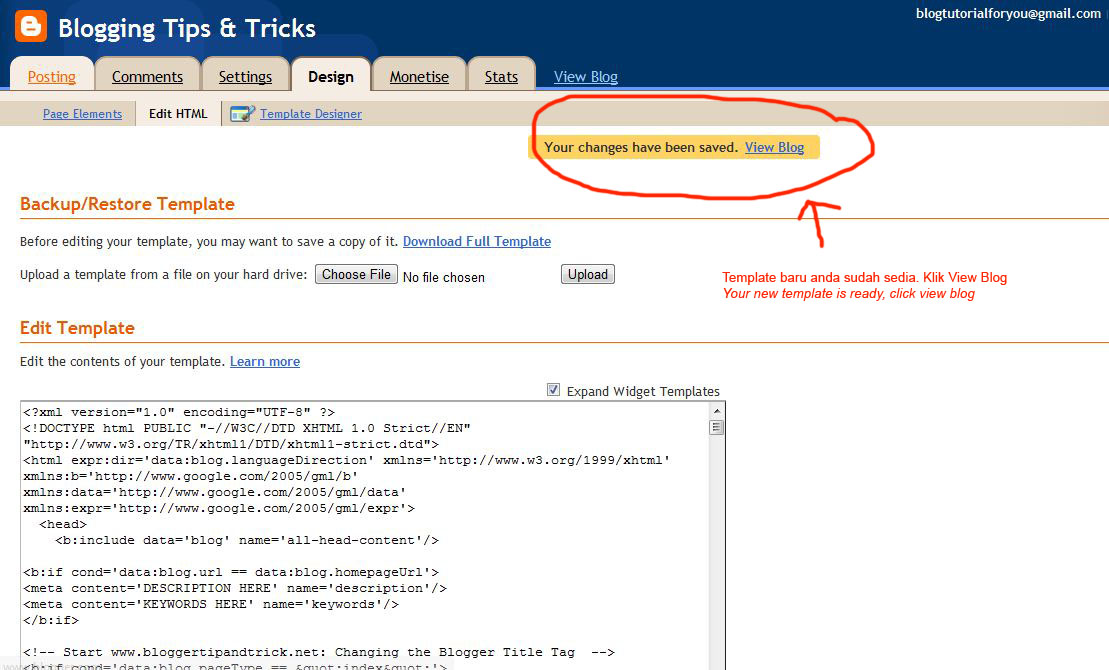
10. Setelah itu, amaran tentang widget akan dikeluarkan. Padam sahaja widget tersebut kerana ia boleh ditambah kemudian. Then the warning will appear, just delete the widget because it can be added later.
Tukar blog template - klik untuk besarkan - click to enlarge
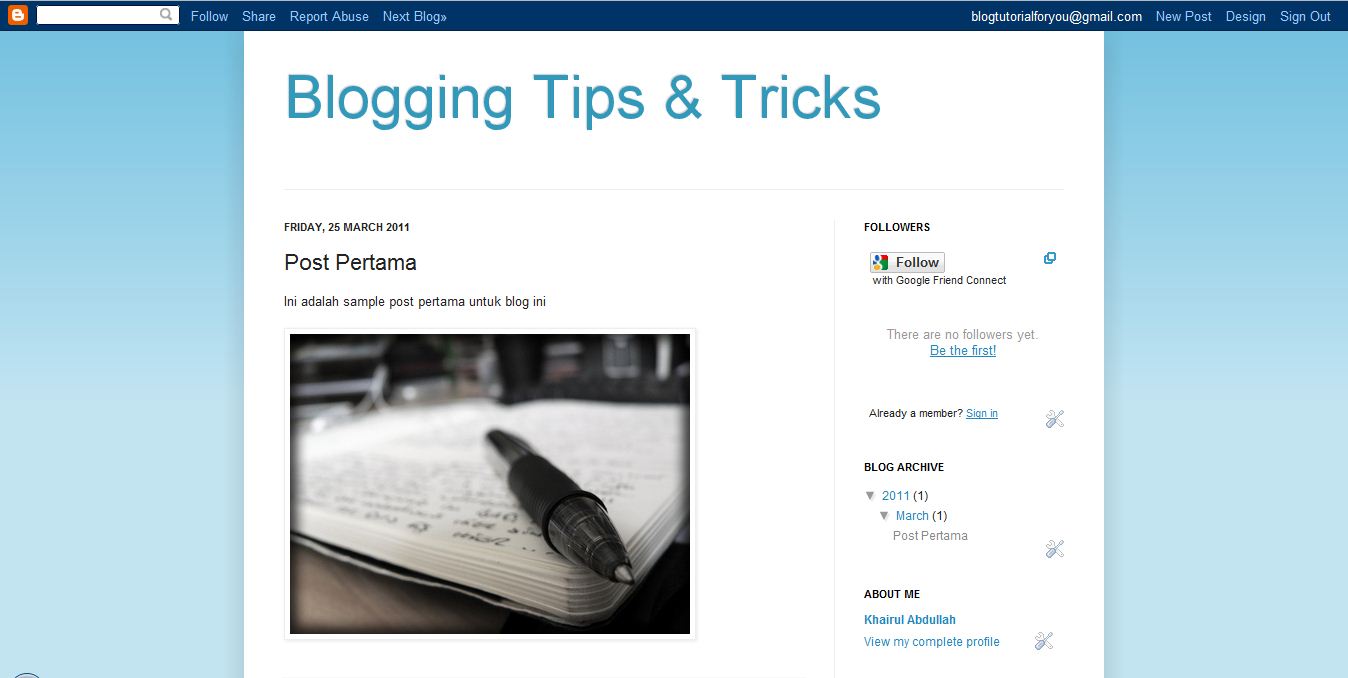
11. Kini template baru anda sudah pun sedia. Klik "View Blog" untuk melihat blog baru anda. Now your new blog template is ready, click "View Blog"
P/S : Sila komen sekiranya tips ini membantu anda ataupun tidak. Sebarang pertanyaan adalah dialu-alukan. Please comment whether this tips is working or not. Question about this tips is welcome.
Creating a blog tips - Klik untuk besarkan - Click to enlarge
2. Log masuk menggunakan akaun Gmail atau Yahoo anda. Sekiranya tiada anda boleh mendaftar atau click di [Dont have a Google Account?] Get Started. Setelah selesai anda akan dibawa ke page seterusnya. Login in using your gmail or yahoo. If you dont have any, please click [Dont have a Google Account?] Get Started to register. Once done, another page will appear (see below)
Creating a blog tips - Klik untuk besarkan - Click to enlarge
3. Selepas itu anda akan terus dibawa masuk ke page "Dashboard" anda. Klik "Create your blog now". After that, Dashboard page will appear and click "Create your blog now".
Creating a blog tips - Klik untuk besarkan - Click to enlarge
4. Masukkan nama blog anda dan kemudian masukkan alamat blog yang anda inginkan dan klick "Check Availability". Sekiranya alamat blog anda sudah digunakan oleh orang lain, anda perlu menggunakan alamat lain sehingga status menunjukkan "This blog address is available" dan klik continue.
Add A Blog Title and add your desired blog address and click "Check Availability". Once available then click continue.
Creating a blog tips - Klik untuk besarkan - Click to enlarge
5. Setelah itu, anda boleh pilih template atau rupa blog yang anda mahukan. Template ini masih boleh ditukar selepas ini, jadi jangan risau. Seterusnya klik continue.
Choose the template. Please note that the template can always be changed later. Then click continue
Creating a blog tips - Klik untuk besarkan - Click to enlarge
6. Selepas itu paparan menyatakan yang Blog anda telah berjaya dicipta. Klik Start Blogging.
Then the message shows that your blog has been created. Click Start Blogging
Creating a blog tips - Klik untuk besarkan - Click to enlarge
7. Mulalah menulis catatan pertama anda. Start writing your first blog then.
Creating a blog tips - Klik untuk besarkan - Click to enlarge
8. Untuk memasukkan gambar ke dalam posting, klik butang gambar. (rujuk gambar) To add image to posting, click image button (refer image)
Creating a blog tips - Klik untuk besarkan - Click to enlarge
9. Gambar boleh dipilh dari 4 sumber utama iaitu dari cakera komputer anda, laman blog, web album ataupun link imej dari internet. Sila pilih dari salah satu sumber dan klik "Add selected".
Image can be choose from 4 different source i.e your computer hard disk, web page, web album or image link from internet. Once chosen, click next.
Creating a blog tips - Klik untuk besarkan - Click to enlarge
10. Setelah gambar dimasukkan, click pada gambar dan menu pilihan akan ditunjukkan. Pilih saiz gambar, kedudukan dan juga masukkan "caption" pada gambar sekiranya ada. Once added, click on the image then menu will appear to change it size, position and to add caption.
Creating a blog tips - Klik untuk besarkan - Click to enlarge
11. Selepas selesai klik save now untuk menyimpan posting ini sebagai draf (tidak akan keluar di blog anda), klik preview untuk melihat dahulu dan klik publish post sekiranya sudah berpuashati. Click save to save posting as draft, click preview to see whether everything is in order and click pulish post to published it.
Creating a blog tips - Klik untuk besarkan - Click to enlarge
12. Blog anda sudah kini sudah siap. Now your blog is ready.
Creating a blog tips - Klik untuk besarkan - Click to enlarge
p/s : Sekiranya anda mempunyai pertanyaan, sila taip di ruangan komen. If you have any question, please ask in comment section.
This feed has moved and will be deleted soon. Please update your
subscription now.
-
The publisher is using a new address for their RSS feed. Please update your
feed reader to use this new URL:
*https://problogger.com/feed/*
Cara Untuk Cek Quota Paket Internet Axis
-
Cara Untuk Cek Quota Paket Internet Axis. Axis adalah satu diantara
provider yang sementara ini banyak diminati lantaran kecepatan koneksi
internetnya yang...